Calculator: Learn How to build a modern Calculator using JavaScript
Easy js Calculator tutorial
Table of contents
You've probably heard that to get better at anything you need to practice more. That's true because, through deliberate practice, you develop muscle memory. That's where projects come in hand. Projects are the best way to learn javaScript, and a calculator is one of the best projects to choose. A calculator covers all the complex interactions with UI and JavaScript.
In this article I'll walk you through the steps it takes to build a completely modern Calculator using plain vanilla JavaScript best practices and modern ES6 practices
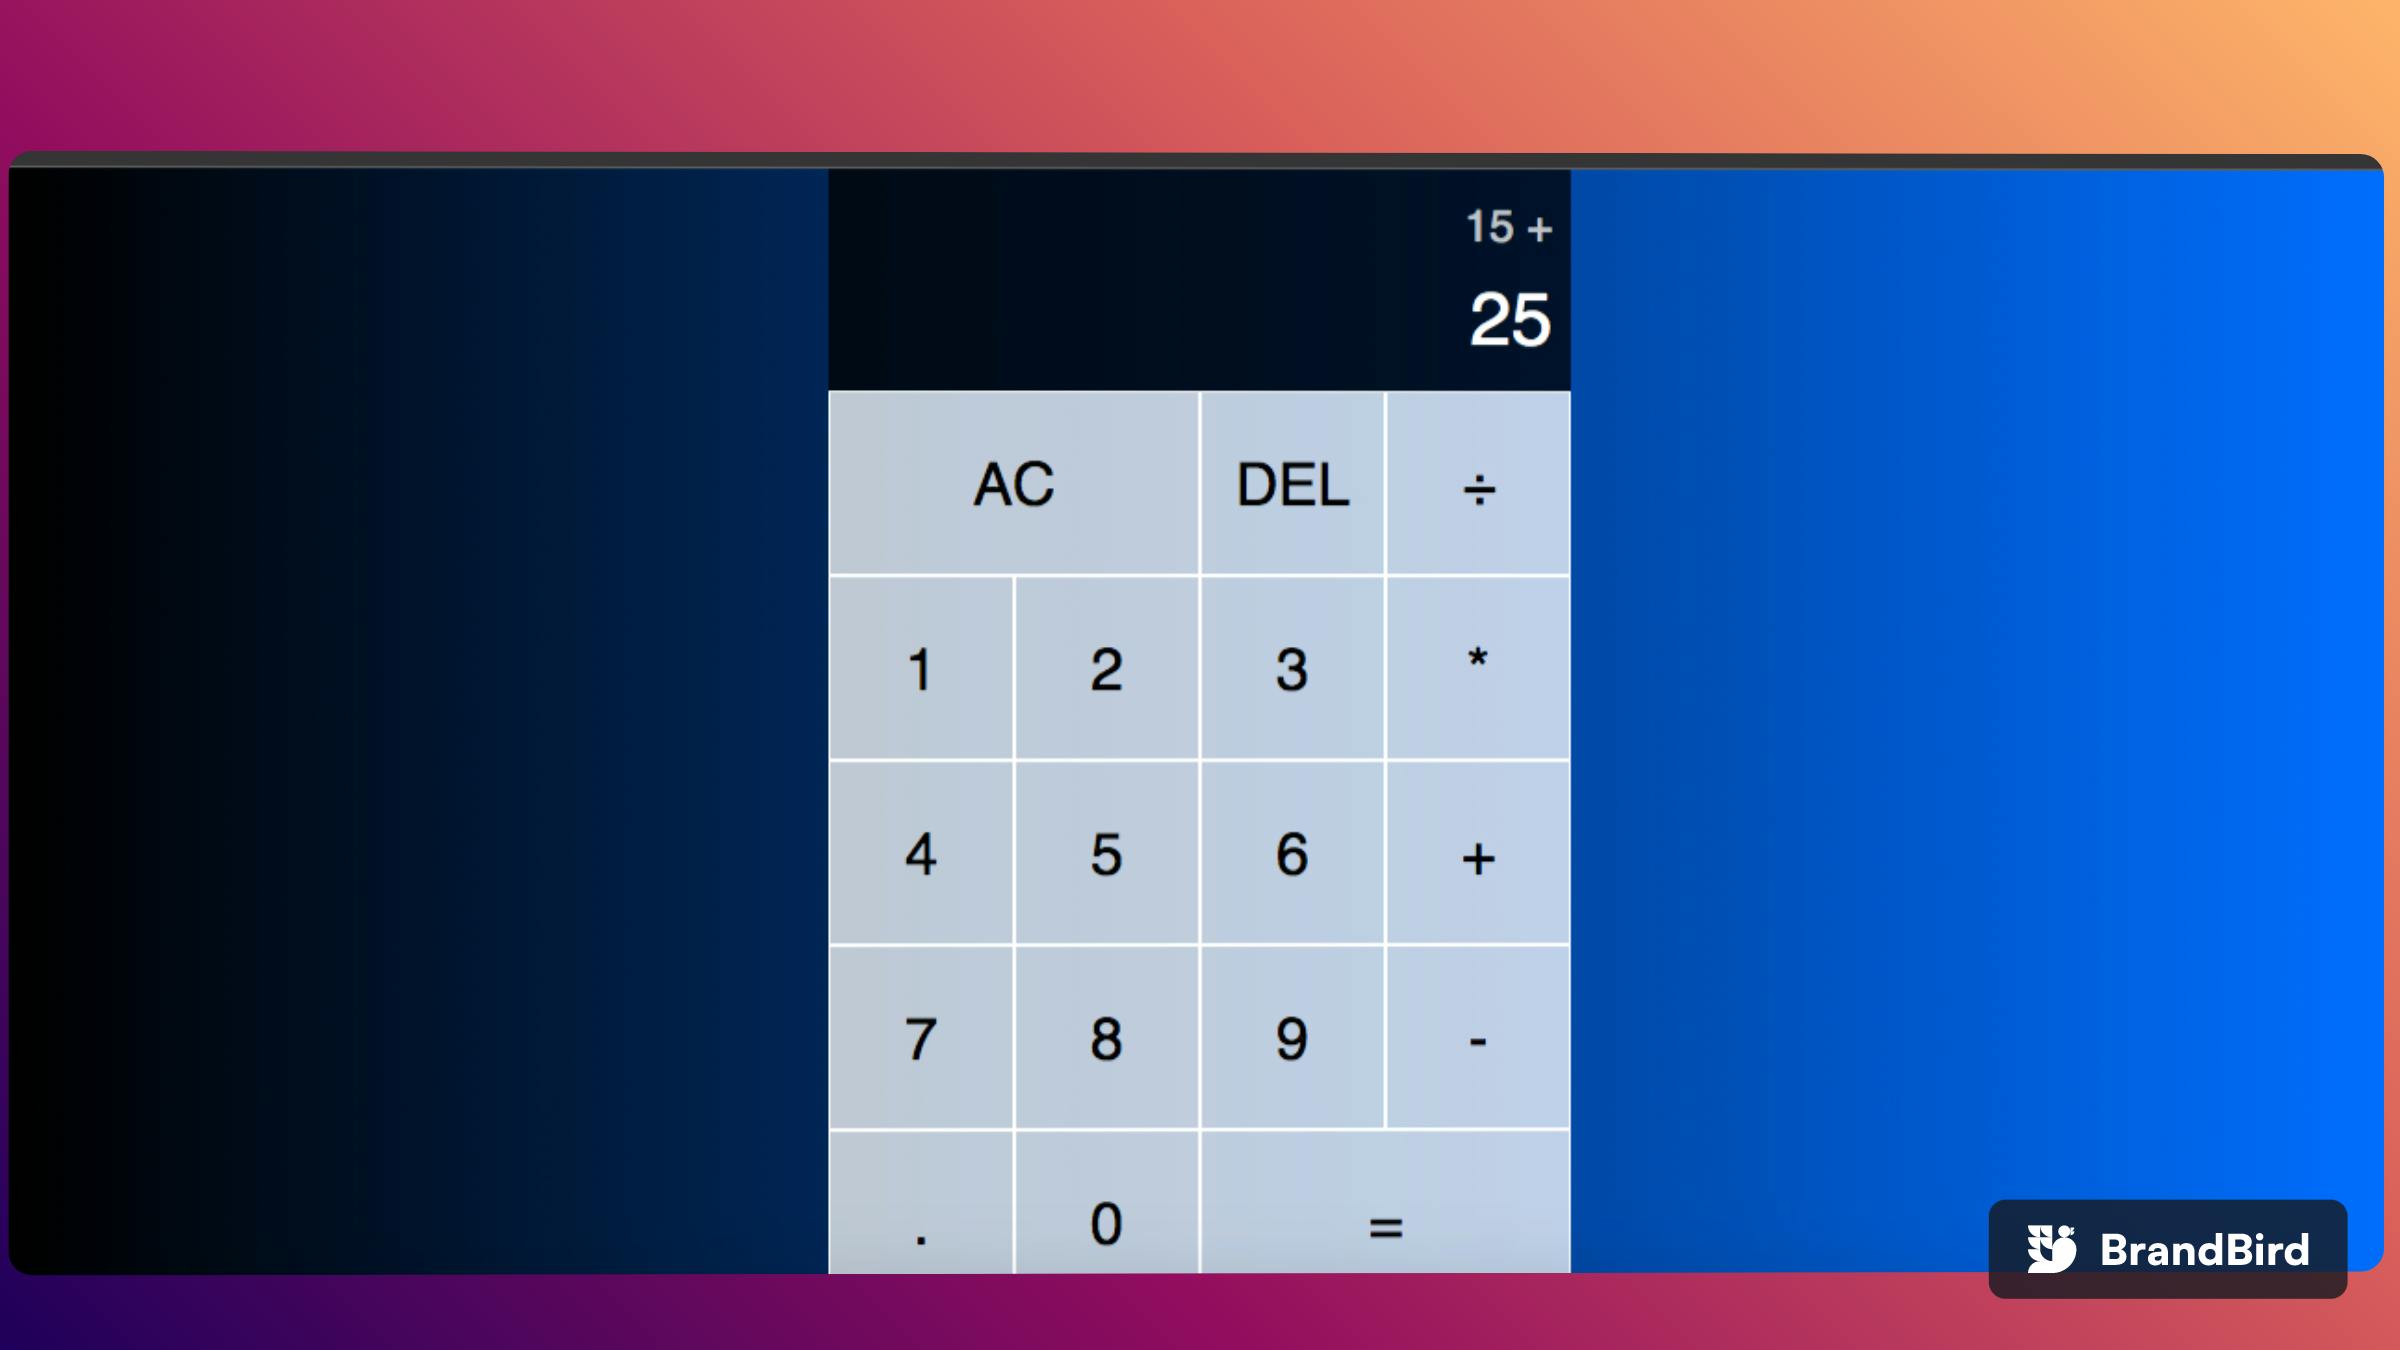
The Calculator will be able to:
Add, multiply, divide, and subtract operations
Delete operations
Clear All operations
Use decimal numbers
Chain operations
Let's get started
Project Setup: How to set up your project
follow the following steps to setup your project:
Create a new folder named "project" and open your code editor (e.g: visual studio code)
create index.html, styles.css, and index.js
link the files inside the HTML
HTML
Create a div with a class .calculator which will wrap everything inside the body tag.
You will also need to create another div with a class .output with two nested div inside it with classes .previous-operand and current-operand respectively to show the previous operand and the current operand in the Calculator screen like this:
<div class="calculator">
  <div class = "output">
     <div class="previous-operand"></div>
     <div class="current-operand"></div>
  </div>
</div>
Next, create all the buttons on the calculator from "AC" to "=" button
like this:
<div class="calculator">
   <div class="output">
     <div class="previous-operand"></div>
     <div class="current-operand"></div>
   </div>
   <button class="span-two">AC</button>
   <button>DEL</button>
   <button>÷</button>
   <button>1</button>
   <button>2</button>
   <button>3</button>
   <button>*</button>
   <button>4</button>
   <button>5</button>
   <button>6</button>
   <button>+</button>
   <button>7</button>
   <button>8</button>
   <button>9</button>
   <button>-</button>
   <button>.</button>
   <button>0</button>
   <button class="span-two">=</button>
</div>
Ps: Remember, you have to include the class .span-two on both "AC" and "=" buttons to make them span two columns later on.
Note, you may have probably struggled to get the symbol "+". If so, you can google the symbol, copy and paste it.
So far so good.
That's all for the HTML Part, let's jump to styles.css and start to style the Calculator to make it look nice.
CSS
Here, you're going to add CSS to style the Calculator. First, let's remove the default browser styles by doing the following:
/** changing default styles of the browser **/
*{
    margin:0;
    padding:0;
    box-sizing:border-box;
}
Next, you need to change the style of the body element:
body{
   font-weight:normal;
   font-family:Gotham Rounded, sans-serif;
   background: linear-gradient(to right, rgb(0, 0, 0),rgb(0, 110, 255));
}
Next, you need to style the screen by selecting the .calculator (wrapping all different buttons and elements) class and style it
like this:
.calculator{
    display:grid;
    align-content:center;
    justify-content:center;
}
Oops!! seems like it's not centred vertically!! you can fix that by giving the .calculator class the full height which means it's going to fill 100% of the height all the time:
.calculator{
    /** previously written code **/
   min-height: 100vh;
}
Alright!! With that fixed, let's move on with styling the .calculator class. To make the buttons look like buttons of a calculator, you'll need to use in this case grid-template-rows and grid-template-columns. so, we are making the columns repeating 4 times while giving them 100px wide. rows are repeating 5 times while giving them 100px wide and giving them an initial minimum value of 120px tall but maximum of it auto(essentially says; as large as it needs to be to fit everything)
like this:
.calculator{
    display:grid;
    align-content:center;
    justify-content:center;
    min-height:100vh;
    grid-template-rows:minmax(120px, auto) repeat(5,100px);
    grid-template-columns:repeat(4,100px);
}
Then, to properly position the buttons, you need to select them and add these styles:
.calculator-grid > button {
    outline: none;
    background-color:rgba(255, 255, 255, .75);
    font-size: 2rem;
    border: 1px solid #fff;
    cursor: pointer;
}
Adding the hover effect:
.calculator-grid > button:hover {
       /** previously written code **/
    background-color:rgba(255, 255, 255, .9)
}
Now, let's style that .span-two class to make the "AC" and "=" buttons span two columns :
.span-two{
    grid-column: span 2;
}
So far so good, but as you can see in your browser, the .output section is not properly styled.
To fix that, you need to style the actual .output as a whole using this trick :
.output{
    background-color: rgba(0, 0, 0, .75);
    grid-column: 1 / -1;
    display: flex;
    justify-content: space-around;
    align-items: flex-end;
    flex-direction: column;
    padding: 9px;
    word-wrap: break-word;
    word-break: break-all;
}
The last thing about CSS is to style the operand which are .previous-operand and .current-operand. you can do that
like this:
.output .previous-operand {
    font-size : 1.5rem;
    color: rgba(255, 255, 255, .75);
}
.output .current-operand{
    font-size: 2.5rem;
    color: #fff;
}
Congrats!! you're done with CSS. Please take a break and come back for the fun part which is JavaScript.
JavaScript
Alright!! let's get started with the most fun part which is coding up the JavaScript. to get started, first you need to select all the different numbers, operands and all the buttons(Clear button, delete button, etc...). To make that easier, you'll need to add attributes in HTML to be easier to select. this is important because you don't need styling classes with javaScript. the code snippets to do it is like this:
<!-- Modifying the HTML by adding attributes to be able to select by. -->


<div class="calculator">
   <div class="output">
     <div data-previous-operand class="previous-operand"></div>
     <div data-current-operand class="current-operand"></div>
   </div>
   <button data-all-clear class="span-two">AC</button>
   <button data-delete>DEL</button>
   <button data-operation>÷</button>
   <button data-number>1</button>
   <button data-number>2</button>
   <button data-number>3</button>
   <button data-operation>*</button>
   <button data-number>4</button>
   <button data-number>5</button>
   <button data-number>6</button>
   <button data-operation>+</button>
   <button data-number>7</button>
   <button data-number>8</button>
   <button data-number>9</button>
   <button data-operation>-</button>
   <button data-number>.</button>
   <button data-number>0</button>
   <button data-equals class="span-two">=</button>
</div>
Here you go. Since you have added the attributes to select the HTML elements, then you can use JavaSript to select them
like this:
const currentOperandElement = document.querySelector('[data-current-operand]');
const previousOperandElement = document.querySelector('[data-previous-operand]');
const numberButtons = document.querySelectorAll('[data-number]');
const operationButtons = document.querySelectorAll('[data-operation]');
const equalsButton = document.querySelector('[data-equals]');
const deleteButton = document.querySelector('[data-delete]');
const allClearButton = document.querySelector('[data-all-clear]');
Now that everything is selected, let's see how to use JavaScript to make the calculator works like the normal calculator. The first thing you need to think about is how to store all the information of what's number typed by the user. the easiest way to do that is to use a Class just
like this:
class Calculator {
  constructor(previousOperandElement, currentOperandElement) {
    this.previousOperandElement = previousOperand,
    this.currentOperandElement = currentOperand
  }

delete() {

  }

appendNumber(number) {

  }

clear() {

  }

chooseOperation(operation) {

  }

compute() {

  }

updateDisplay() {

  }

}
So, what's going on so far? Above we have created a Calculator class which holds the constructor. This constructor will take all the inputs the user will type as well as all the functions for our calculator. these functions will be:
delete(): This function will remove a single number.
append number(): This function will add the number every time the user select that number.
Clear(): This function will clear up all different variables.
chooseOperation(): This function will let the user select which operation to use and make it function effectively.
compute(): This function will take all the values inside the calculator and compute a single value for what we need to display on the screen.
updateDisplay(): This function will update the values inside the output.
Next, let's think about the different properties the calculator needs to store. First, you need to know the current operand the user is working on, previousOperand the user entered, and the operation they selected if any. So you need to be able to remove all these values, and that can be done inside a clear function
like this:
class Calculator {
  constructor(previousOperandElement, currentOperandElement) {
    this.previousOperandElement = previousOperand,
    this.currentOperandElement = currentOperand
    this.clear()
  }

clear() {
    this.previousOperand = "";
    this.currentOperand = "";
    this.operation = undefined;
  }

}
Note: Remember, as soon as we create our Calculator, we need to call clear() function as shown above. This is because we need to clear all of the inputs to set them to the default values as soon as we create a new Calculator.
Now that we know all the functions the Calculator will use, let's make all the variables previously created, operate on the Calculator Object like this :
const calculator = new Calculator(previousOperandElement, currentOperandElement);
Next, let's make the numberButtons function
like this:
numberButtons.forEach(button => {
  button.addEventListener('click', () => {
    calculator.appendNumber(button.innerText)
    calculator.updateDisplay()
  })
})
Now, you'll need to write the appendNumber() and updateDisplay() functions to make them works
like this:
class Calculator {
  /** previously written code **/

    appendNumber(number){
     if (number === "." && this.currentOperand.includes(".")) return
     this.currentOperand = this.currentOperand.toString() + number.toString()
   }
    updateDisplay(){
     this.currentOperandElement.innerText = this.currentOperand;
     this.previousOperandElement.innerText = this.previousOperand;
   }

}
Next, let's make the operationButtons function as well :
operationButtons.forEach(button => {
  button.addEventListener('click', () => {
    calculator.chooseOperation(button.innerText)
    calculator.updateDisplay()
  })
})
Now, you'll need to write the choose operation function to make it work
like this:
class Calculator {

    /** previously written code **/

    chooseOperation(operation) {
      if (this.currentOperand === "") return
      if(this.previousOperand != "") {
        this.compute()
      }
      this.operation = operation;
      this.previousOperand = this.currentOperand;
      this.currentOperand = "";
  }

}
Next, let's make the equalsButton function also :
equalsButton.addEventListener('click', button => {
  calculator.compute()
  calculator.updateDisplay()
})
Now, let's work on implementing the compute() function :
class Calculator {

    /** previously written code **/

    compute() {
    let computation
    const prev = parseFloat(this.previousOperand)
    const current = parseFloat(this.currentOperand)
    if (isNaN(prev) || isNaN(current)) return
    switch (this.operation) {
      case '+':
        computation = prev + current
        break;
      case '-':
        computation = prev - current
        break;
      case '*':
        computation = prev * current
        break;
      case '÷':
        computation = prev / current
        break;
      default:
        return
    }
    this.currentOperand = computation;
    this.operation = undefined;
    this.previousOperand = '';
  }

}
Next, let's make the allClearButton function as well :
allClearButton.addEventListener('click', button => {
  calculator.clear()
  calculator.updateDisplay()
})
Next, let's make the deleteButton function also :
deleteButton.addEventListener('click', button => {
  calculator.delete()
  calculator.updateDisplay()
})
Now, let's work on implementing the delete() function, but here you'll need to use the slice method to get the very last value from the string and cut it off
like this:
class Calculator {

  /** previously written code **/

    delete() {
    this.currentOperand = this.currentOperand.toString().slice(0, -1);
  }
}
Congrats!! Now, the Calculator is entirely functional at a base value but the actual display of our Calculator is not that nice!! we don't have commas between numbers, the operands are not shown up in the previous operand, so it needs to be fixed. Just a couple of lines of code. First thing we need to modify the update display() function and create getDisplayNumber() function to delimit numbers with commas
like this:
/** previously written code here **/
updateDisplay() {
    this.currentOperandElement.innerText =
      this.getDisplayNumber(this.currentOperand)
    if (this.operation != null) {
      this.previousOperandElement.innerText =
        `${this.getDisplayNumber(this.previousOperand)} ${this.operation}`
    } else {
      this.previousOperandElement.innerText = ''
    }
  }

/** getDisplayNumber acting like a helper function to delimit numbers with commas **/
getDisplayNumber(number) {
    const stringNumber = number.toString() // for splitting on decimal characters inside it.
    const integerDigits = parseFloat(stringNumber.split('.')[0]) // turning a string to an array.
    const decimalDigits = stringNumber.split('.')[1] // getting second portion out of the array, which is number after decimal place.
    let integerDisplay
    if (isNaN(integerDigits)) {
      integerDisplay = ''
    } else {
      integerDisplay = integerDigits.toLocaleString('en', { maximumFractionDigits: 0 }) // "en" in the localeString means : english.
    }
    if (decimalDigits != null) {
      return `${integerDisplay}.${decimalDigits}`
    } else {
      return integerDisplay
    }
  }
Here is what the final version of the project looks like:
 Conclusion
Now that you've made it to the end of this project, you have a completely functioning modern JavaScript Calculator working in your browser. if you found this article helpful, please give it a thumbs up. Happy Coding!!
